#
xDelta
An xDelta patch contains difference data between two separate versions of a file.
xDelta patches are commonly used to correct minor issues in the original file without requiring the user to download the new file entirely, such as amending minor grammatical errors in subtitles or correcting a couple of typesettings in anime releases.
This guide will show you how to use xDelta3 Cross GUI, a tool for creating and using xdelta3 patches.
#
Installation
Download the latest release of xDelta3 Cross GUI. For Windows, this will be
xdelta3-cross-gui_win_x86.zipExtract the
.ziparchive's contents. In the destination folder, find and launchxdelta3_cross_gui.exe
Download the latest release of xDelta3 Cross GUI. For macOS, this will be
xdelta3-cross-gui_macOS_x86_64.tar.gzExtract the
.tar.gzarchive's contents. In the destination folder, find and launchxDelta3 Cross GUI.app
Download the latest release of xDelta3 Cross GUI. For Linux, this will be
xdelta3-cross-gui_linux_AppImage_x86_64.tar.gzExtract the
.tar.gzarchive's contents. In the destination folder, find and launchxDelta3_Cross_Gui-x86_64.AppImage
#
Creating Patches
#
Prerequisities
To create an xDelta3 patch, you will need two files: the original version to be changed and the new version including your fixes.
Your patched version should be named properly to distinguish it from the original. For anime, version identifiers usually go after the season/episode number:
- Including
v#in the file name:[Group] Anime - S01E01v2.mkv,[Group] Anime - S01E01v3.mkv, etc. - Including
REPACK#in the file name:Anime.S01E01.REPACK-GROUP.mkv,Anime.S01E01.REPACK2-GROUP.mkv, etc.
Making changes to your files will change its CRC32 value. This should be changed if used in your file name.
#
Process
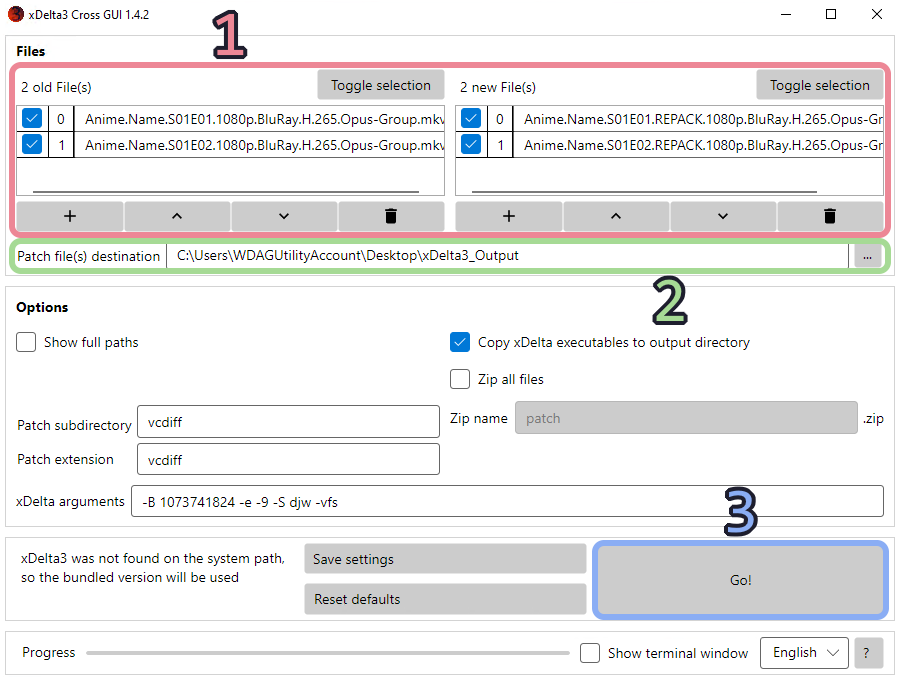
In xDelta3 Cross GUI, navigate to Files and add the old and new versions of your file(s). You must have an equal number of files on both sides (i.e. two old files must be accompanied by two new files)
- If you are patching multiple files, make sure that their indexes match on both sides. If they do not match, check the box of the file you want to move and use the arrows below to move the file up/down
Set your patch file destination. You can paste the exact location or select it by pressing the three dots (...) on the side
At the bottom, select Go! to start creating your patch file(s)
Once complete, share the patch file(s) (
.vcdiff/.xdelta) found in your output folder ->vcdiff. Alternatively, you may compress and share the entire output folder forautomatic patching
#
Using Patches
#
Automatic
Patches created using xDelta3 Cross GUI include xdelta3 executables and pre-configured scripts in the output folder.
Download and extract the patch
Add your current files to the
originalfolderRun the patch script for your operating system:
- For Windows, this will be
2.Apply Patch-Windows.bat - For macOS, this will be
2.Apply Patch-Mac.command - For Linux, this will be
2.Apply Patch-Linux.sh
- For Windows, this will be
Your patched files will be available in the
outputfolder
#
Manual
Download the latest release of xdelta-gpl:
- For Windows, this will be
xdelta3-3.1.0-x86_64.exe.zip
- For Windows, this will be
Extract the archive's contents
Add your current files and patches to your working folder
Launch a terminal window in your working directory. Run the following command, replacing
<input_file>with the location of the current file,<diff_name>with the name of the.vcdiffor.xdeltapatch, and<output_file>with the name of the final file:🖥️ Windows Single file:
.\xdelta3-3.1.0-x86_64.exe -d -s "<input_file>" "<diff_name>" "<output_file>"Your patched files will be available in your working directory