#
Sonarr
This guide was written with the purpose of having something to start with since I personally think other popular guides like TRaSH Guides are still a bit too advanced for someone who has never touched the *ARR family of apps.
This guide was written for Sonarr V3, although the initial setup covered here remains similar for Sonarr V4 with the biggest change being Custom Formats replacing Release Profiles.
#
Prerequisite
- Install a torrent client like qbittorrent and enable Web-UI.
- Install Prowlarr. Do not install it as a service.
- Install Sonarr. Do not install it as a service.
#
Prowlarr
- Launch Prowlarr. It's accessible through http://localhost:9696/ by default.
- Click
Add Indexer. - Search
Nyaaand add it along with any other tracker you want. - Launch Sonarr. It's accessible through http://localhost:8989/ by default. Go to
Left Pane -> Settings -> General -> API Key -> Copy - Now go back to Prowlarr
Left Pane -> Settings -> Apps -> Add Sonarr
#
Sonarr
- Launch Sonarr. It's accessible through http://localhost:8989/ by default.
#
Indexers
- Click on
Show Advancedat the top. - Go to
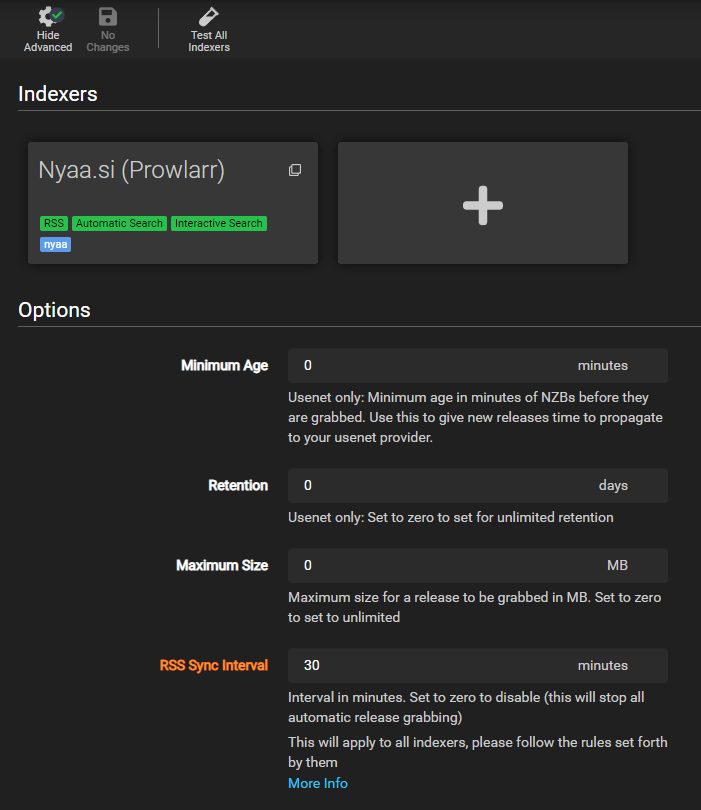
Settings -> Indexersand you'll see that the Indexers you added in Prowlarr have been added to Sonarr.
#
Download Client
- Go to
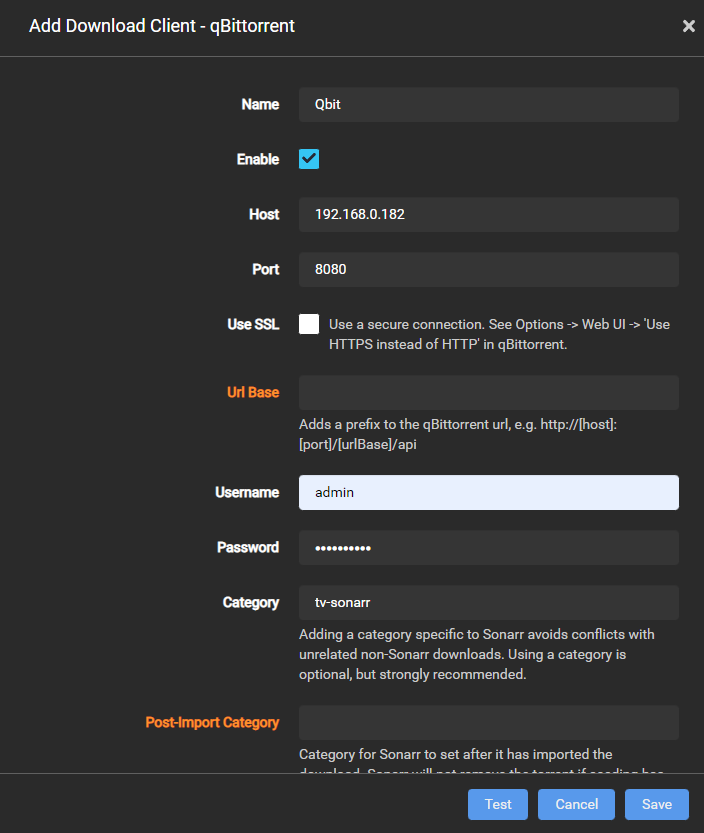
Settings -> Download Clientsand add your download client. - The Category (or tag depending on your client of choice) here is important, as this is how Sonarr identifies a download. This is what Sonarr will assign to all the downloads to keep a track of them and will not see them unless they have the specified category/tag.

#
Media Management
- Go to
Settings -> Media Management - Change the naming based on TRaSH's Recommended Naming Scheme. You can also alter it based on your preferences.
- Add Root Folder. This is the folder where your files will be copied/moved/hardlinked to depending on your choice after organizing, e.g,
/HDD/plex/anime - Note: Download Client's save location and Sonarr's Root Folder location must be different folders while also being on the same disk.
#
Profiles
Currently, Sonarr's capability of auto-downloading non-seasonal anime is quite bad due to extremely bad naming used by most uploaders and most of the time will grab a sub-par release. This is why we won't be automating those.
- Go to
Left Pane -> Settings -> Profiles -> Release Profiles
#
Seasonals
- We'll be making one release profile for each group or show.
- The first release profile will be for general seasonals and grabbing
SubsPlease. Tag it appropriately because that's how we'll be assigning these profiles to a show. No Tag means it's globally applied.
- You can make as many profiles you want for fansub releases as you want.
- Once you are done adding all the groups you want to grab, it should look like this:

- Note:
- If you want to grab a release from more than one group for a show (either based on scores, preferences or just whoever releases faster), you'll have to make a new
Release Profilewith multiple release groups in theMUST CONTAINfield to get the desired result (example). - This is because for a release to be grabbed, all the
Release Profiletags you assign to a show must be satisfied. Assigning two profiles tags likely(LostYears) andsp(SubsPlease) to a single show will not work because that tells Sonarr to find a release with BOTH words present in the folder/filename (example).
- If you want to grab a release from more than one group for a show (either based on scores, preferences or just whoever releases faster), you'll have to make a new
#
Adding a Seasonal Show
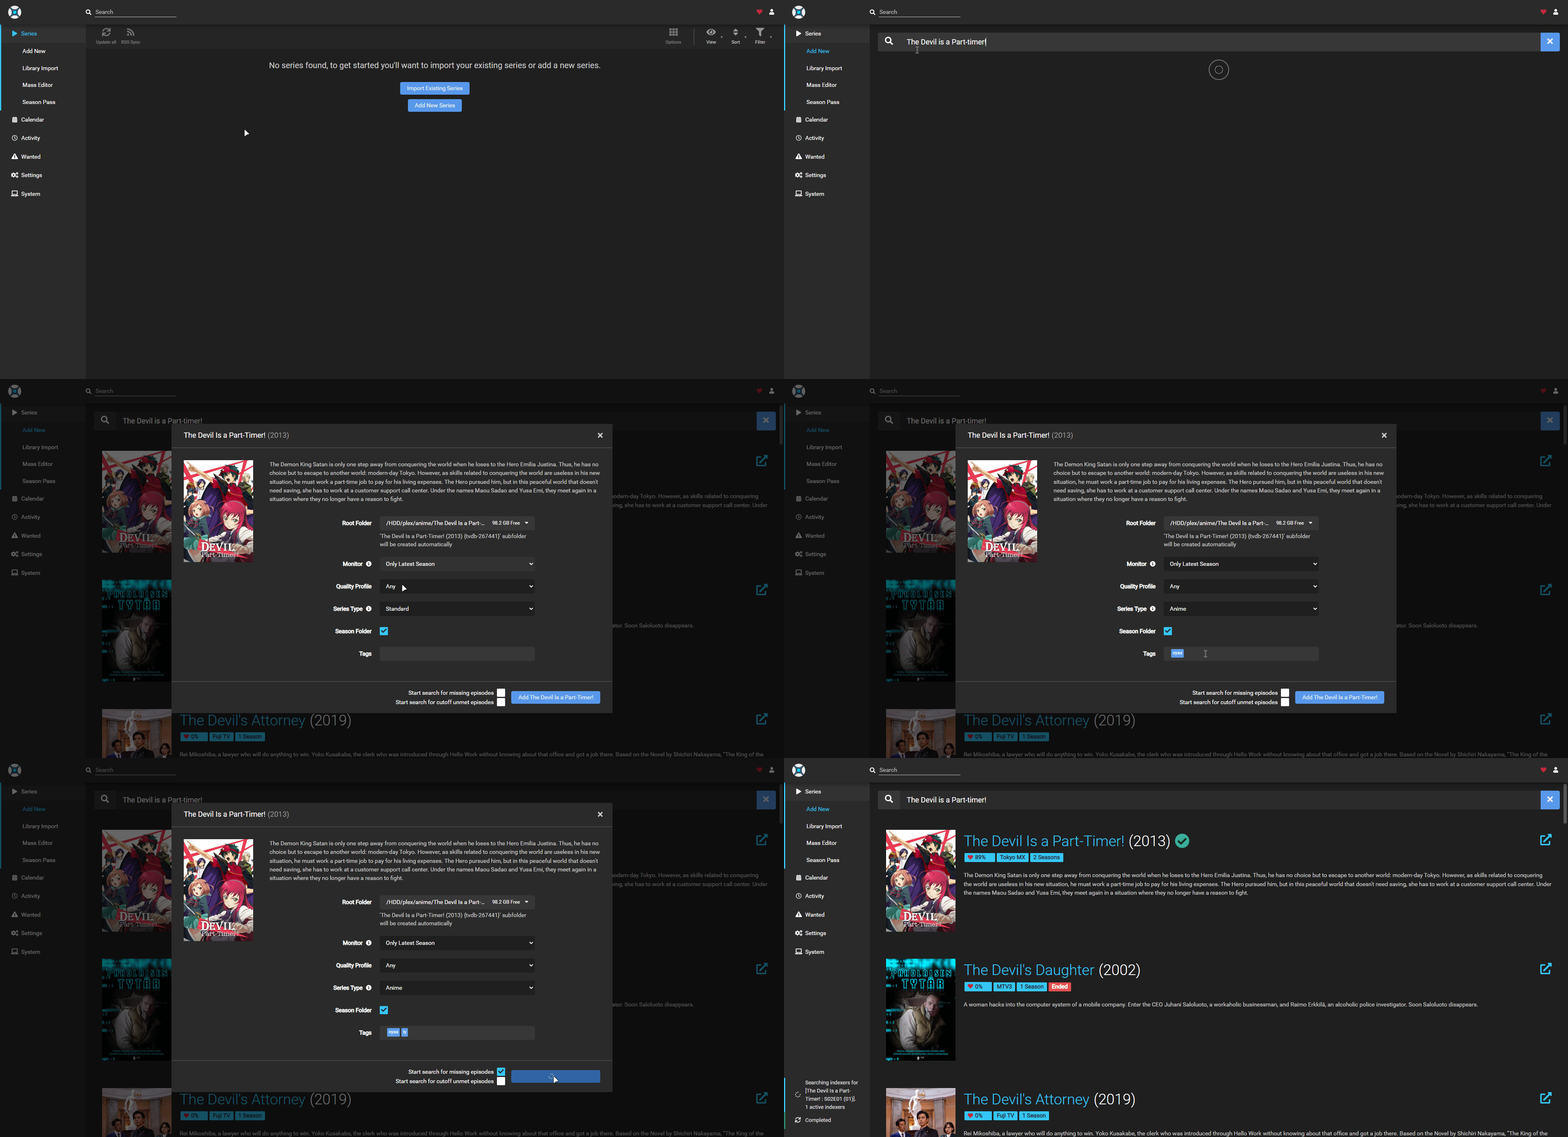
- Click on the Search bar on the top right and find the show you want to add.
- Select its location and assign the indexer tag and the release tag.
- Check the
Start search for missing episodesoption and click theAddbutton. - From personal experience, it's better to use
Anyprofile instead of1080pdue to how multiple anime releasers don't bother putting1080pin the title, causing them to be rejected. You might also have to allowUnknownunderAnyprofile because some releasers don't put any information in the title. - Set the
Series TypetoAnime.
- It'll now show up in your client along with the
tv-sonarrtag and Sonarr will import a hardlinked copy into the Root Folder (/HDD/plex/anime).
- Your new folder structure should look like this:

#
Downloading Complete Seasons/Shows
- Click on the Search bar on the top right and find the show you want to add.
- Note: Do NOT check the
Start search for missing episodesoption.
- Note: Do NOT check the
- We will manually pick a release and then import it through Sonarr for organizing.
- (Optional) Head over to SeaDex to grab the best release.
- You can do this by simply navigating to your handpicked release's folder via
Left Pane -> Wanted -> Manual Import -> Navigate to the folder containing the episodes
#
Hardlinks
- What is a Hardlink?
- Hardlinks are enabled by default. So everything above should have been hardlinked instead of copied/moved.
#
Check Hardlinks
For Windows, the best way to check Hardlinks is FindLinks

For Linux, TRaSH already covers three methods to check Hardlinks so I won't be covering those.
#
Troubleshooting
If your hardlinks aren't working, there could be a few oversights causing this:
- You cannot cross file systems between hardlinks so make sure you aren't doing that. TRaSH covers this well here.
- Permission issues with file systems, especially if you are using NTFS formatted drives on a Unix system. Keep in mind that you can't change the permissions on an NTFS file system the same way you would on an EXT4 file system
- Executing the commands listed down below will recursively change the permissions of the targeted folder/drive to
775/664($USER). Having the folder/drive permissions set to775/664will prevent Sonarr from running into permission issues when hardlinking/copying files.
sudo chown -R $USER:$USER /data
sudo chmod -R a=,a+rX,u+w,g+w /data
