#
mpv
mpv is a versatile and lightweight media player with extensive customizability. It is used and recommended by most enthusiasts as it supports a wide range of video, audio, and subtitle formats. Additionally, it offers many advanced features and is available on multiple platforms.
#
Installation
#
Windows
- Download the latest Windows build of mpv from mpv-winbuild. For most users, this should be
mpv-x86_64-YYYYMMDD-git-abcxyz.7z. - Once downloaded, extract the archive's contents to your desired location.
- In the extracted folder, run
mpv-register.bat. This registers mpv with Windows so it can open media files by default and appear in "Open with" menus, but you will still need to set mpv as your default media player in Windows settings.
Simply moving the mpv folder after registration will break the setup.
If you move it, you must run mpv-register.bat again from the new location.
Winget is Microsoft's built-in package manager for Windows 10 and Windows 11. Installing mpv via Winget requires no extra software to be downloaded and automatically adds mpv to your PATH, allowing you to access it from your terminal. Winget takes from the shinchiro builds, which are listed on mpv's website.
Run PowerShell as an Administrator by searching for it in the Start menu, and click on "Run as Administrator". Afterwards, you can install mpv using winget install:
If PowerShell is not ran as an Adminstrator, mpv will install but you will not be able to set file associations!
winget install -e --id shinchiro.mpvAssuming it installed to C:\Program Files\MPV Player, you can set up file associations with:
cd 'C:\Program Files\MPV Player\installer'
.\mpv-install.bat
winget upgrade shinchiro.mpvwinget uninstall shinchiro.mpvScoop is a command line package manager for Windows. Unlike other installation methods, Scoop downloads and manages packages in a portable way, keeping them neatly isolated in %userprofile%/scoop and automatically adding them to your PATH.
Scoop can be installed using their install script in a PowerShell window:
Set-ExecutionPolicy RemoteSigned -Scope CurrentUser
irm get.scoop.sh | iex
Then, install mpv using scoop:
scoop bucket add extras
scoop install extras/mpv-git
scoop update mpv-gitscoop uninstall mpv-gitWe suggest sticking with the official mpv player as forks tend to lag behind in updates.
mpv can also be found in the various forks below:
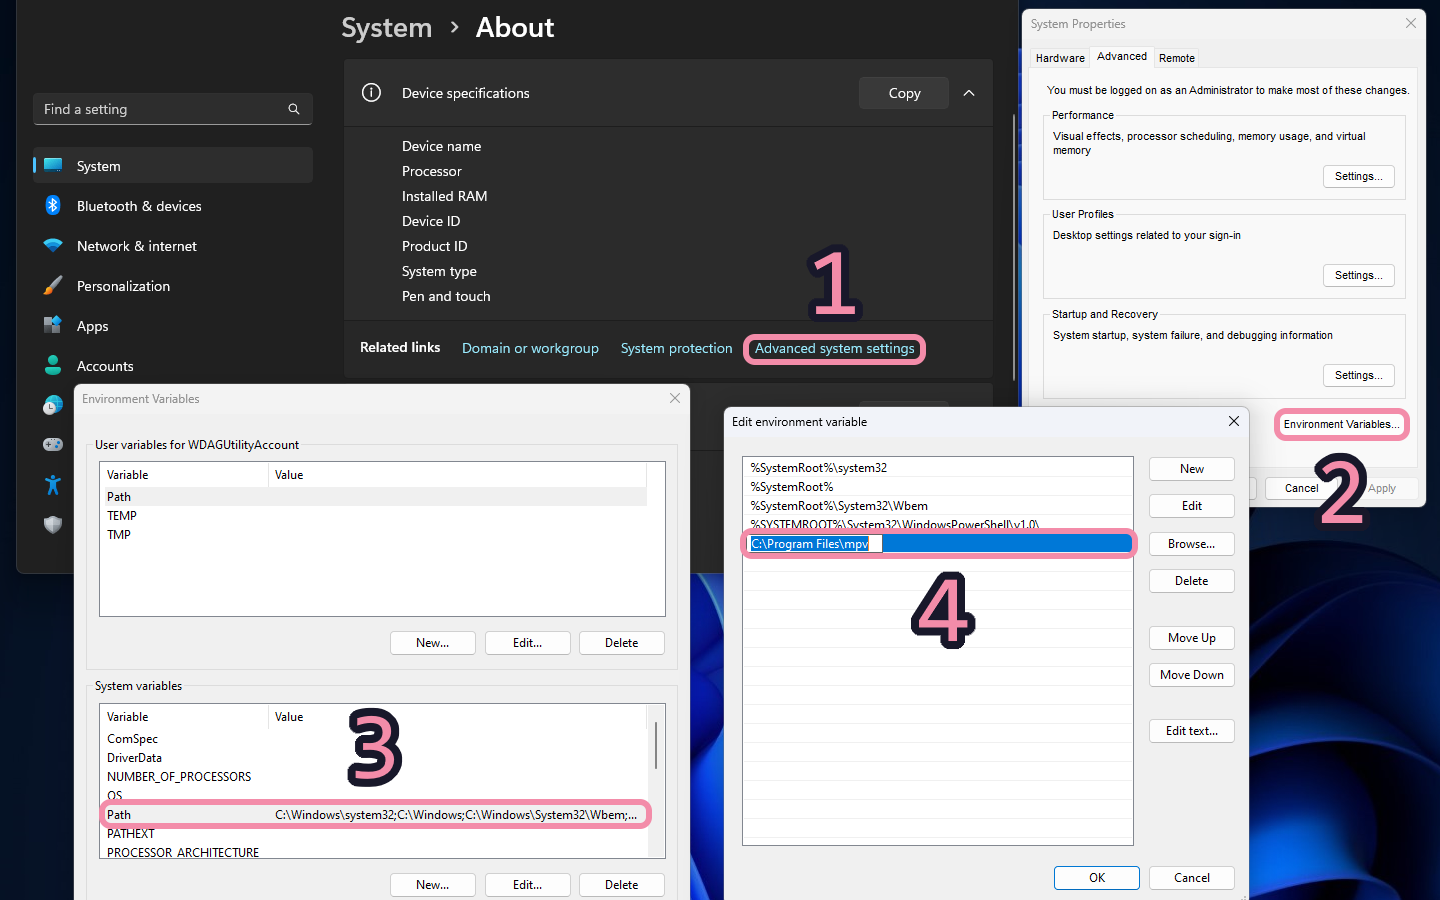
If you want to access mpv from the command line, you will need to add it to Windows PATH:
- In Windows Settings -> System -> About, locate Advanced System Settings. Head to Advanced and click on Environment Variables...
- Under System Variables, select Path and click on Edit...
- Click New and point the variable to the folder where
mpv.exeis located/installed - Launch a new terminal window. mpv can be accessed from the command line using
mpv
#
macOS
Install Homebrew. Then, run the following command in your terminal:
brew install mpv
#
Linux
Distributions usually package outdated, unmaintained, and/or unsupported versions of mpv. We recommend using mpv-build or third-party packages instead.
The following packages are not maintained by official mpv developers:
#
Config Overview
By default, mpv's config can be found under %APPDATA%/mpv/. However, a folder named portable_config next to where mpv.exe is stored can override this location as the config folder.
%APPDATA%)
.
└── mpv/
    ├── fonts/
    ├── script-opts/
    ├── scripts/
    ├── shaders/
    ├── input.conf
└── mpv.confportable_config)
.
├── mpv.exe
└── portable_config/
    ├── fonts/
    ├── script-opts/
    ├── scripts/
    ├── shaders/
    ├── input.conf
└── mpv.conf%userprofile%/scoop/persist/mpv-git)
.
└── portable_config/
    ├── fonts/
    ├── script-opts/
    ├── scripts/
    ├── shaders/
    ├── input.conf
└── mpv.confSome folders may not be present by default and will need to be created.
For more details, see mpv's documentation on files.
#
Basic Config
mpv is a great player out-of-the-box which can be extensively customized to your liking.
We recommend taking your time to create your own config. If you want to get up and running quickly, we suggest using the generic mpv.conf config below:
mpv.conf
## Video
profile=high-quality

## Behavior (personal preference)
keep-open=yes
save-position-on-quit

## Screenshots
screenshot-format=png
screenshot-dir="~/Pictures/mpv"
screenshot-template="%F-%p-%n"
screenshot-high-bit-depth=no

## Language Priority
## Sub
## Add enm before eng for honorifics
slang=eng,en
alang=jpn,ja

## Dub
#slang=zxx,eng,en
#alang=eng,en
#subs-with-matching-audio=forced
See mpv's user manual for a detailed explanation of all the options.
#
Advanced Config
mpv can be fine-tuned to meet your specific needs, from tweaking playback behavior to customizing video, audio, and subtitle settings. This section outlines the common options that can improve your experience.
This guide assumes you know the location of your config folder. See
#
Debanding
Color banding is a visual artifact that is typically seen in gradients, where the colors can be easily differentiated by the human eye. See Tom Scott's video explaining color banding.

Banding (left) vs. No banding (right)
mpv includes built-in debanding with sensible defaults, so no additional
configuration is required. You can enable it anytime during playback by
pressing b (default keybind). If the default deband is inadequate for a
specific video, you may need to experiment with the --deband-*
options to find what works best.
Keep in mind that stronger settings will cause a loss of detail and should be reserved for situations where the loss of detail is acceptable for reducing banding.
#
Scaling
Scaling is the process of taking content that does not match your screen resolution and resizing it to fit your display. See the Playback Guide for more information.
mpv has a built-in profile called high-quality which enables better upscaling using ewa_lanczossharp. By default, mpv uses lanczos and hermite. This option is necessary to enable even if you use an external shader, as it can act as a fallback.
Scalers only work when the resolution of your video does not match your display. They do not activate if the content resolution already matches your display resolution.
If you use high-end hardware, we recommend using the following shaders:
- ArtCNN_C4F32.glsl for higher quality sources
- nnedi3-nns128-win8x4.hook for lower quality sources
Download both the shader files and place them in your shaders folder.
Next, add the following to your input.conf, replacing g with the bind of your choice, if necessary (case-sensitive):
g cycle-values glsl-shaders "~~/shaders/nnedi3-nns128-win8x4.hook" "~~/shaders/ArtCNN_C4F32.glsl" ""To toggle the shader, press g during playback to select the suitable shader.
If you use mid-range hardware, we recommend sticking to mpv's built-in high-quality profile.
To use the profile, add the following to the top of your mpv.conf:
profile=high-qualityThis is included in the
If you use low-end hardware, we recommend sticking to mpv's default profile, which aims for a balance between quality and performance. No other changes need to be made as it is used by default.
If you use very low-end hardware, we recommend sticking to mpv's fast profile, which prioritizes performance over quality.
To use the profile, add the following to the top of your mpv.conf:
profile=fast
#
Subtitle Restyling
Most releases will use their own font for .ass subtitles.
These can be manually overridden by mpv, which can help improve readability or match personal preferences.
Restyling subtitles may lead to incorrect rendering in some cases.
Below are a couple of commonly used styles:

Download this font here or use the button below:
Run the .otf font file to install it system-wide or put it in your fonts folder. Add the following to your mpv.conf:
# Set sub-ass-override to "no" as we only need to enable it for specific cases
sub-ass-override=no
sub-ass-style-overrides=playresx=1920,playresy=1080
sub-font="Gandhi Sans"
sub-font-size=50
sub-color="#FFFFFF"
sub-margin-y=40
sub-border-size=2.4
sub-border-color="#FF000000"
sub-shadow-color="#A0000000"
sub-shadow-offset=0.75
sub-bold=yes
sub-ass-style-overrides=Kerning=yes
Download this font here or use the button below:
Run the .ttf font file to install it system-wide or put it in your fonts folder. Add the following to your mpv.conf:
## Restyle Subtitles
# Set sub-ass-override to "no" as we only need to enable it for specific cases
sub-ass-override=no
sub-ass-style-overrides=playresx=1920,playresy=1080
sub-font="Cabin"
sub-font-size=50
sub-color="#FFFFFFFF"
sub-margin-y=40
sub-border-size=2.4
sub-border-color="#FF000000"
sub-shadow-color="#A0000000"
sub-shadow-offset=0.8
sub-ass-style-overrides=Kerning=yes
This is a modified version of Cabin made by @astolfo69 (RaptoR) in the SeaDex Discord server.
Download this font using the button below:
Run the .ttf font file to install it system-wide or put it in your fonts folder. Add the following to your mpv.conf:
## Restyle Subtitles
# Set sub-ass-override to "no" as we only need to enable it for specific cases
sub-ass-override=no
sub-ass-style-overrides=playresx=1920,playresy=1080
sub-font="Cabin F"
sub-font-size=50
sub-color="#FFFFFFFF"
sub-margin-y=40
sub-border-size=2.4
sub-border-color="#FF000000"
sub-shadow-color="#A0000000"
sub-shadow-offset=0.8
sub-ass-style-overrides=Kerning=yes
To activate it with a key, add the following to your input.conf, replacing k with the bind of your choice, if necessary (case-sensitive):
k cycle_values sub-ass-override "force" "no"
#
Auto Profiles
Auto profiles allow users to automate actions based on certain conditions. Tasks such as
For instance, some seasonal releases may exhibit banding issues and use subjectively less-appealing subtitle fonts. To address this, we can create a simulcast auto profile, which automatically applies
Add the following to the end of your mpv.conf:
[crunchyroll]
profile-cond=filename:match("SubsPlease") or filename:match("HorribleSubs")
profile-restore=copy
sub-ass-use-video-data=aspect-ratio

[simulcast]
profile-cond=(function(a)for b,c in ipairs(a)do if filename:match(c)then return true end end end)({"SubsPlease","Erai%-raws","Tsundere%-Raws","%-VARYG","HorribleSubs","SubsPlus%+", "Yameii"})
profile-restore=copy
deband=yes
Your auto profile(s) should be placed at the end of your mpv.conf in order to prevent conflict.
#
Custom Scripts
mpv supports loading custom scripts, allowing you to further expand the player's functionality.
Below is a list of some popular scripts:
- autocrop - Automatically crop the video by using lavfi's cropdetect filter to detect black bars
- autoload - Automatically adds all files present in the folder to a playlist
- change-refresh - Script to automatically change the refresh rate of the display to reflect the current video
- mpv-playlistmanager - Script to create and manage playlists
- mpv-webm - WebM maker for mpv
- pause-when-minimize - Pauses playback when minimizing the window, and resumes playback when brought back
- thumbfast - Display thumbnails when scrubbing video (may be needed for some
Skins ) - trackselect - Select tracks based on their title
- Navigate to your mpv
config directory - Locate the
scriptsfolder. You may need to create this folder if it doesn't exist - Drag your script file(s) (e.g.
.lua) into the folder
Your scripts are automatically loaded when you launch mpv. If mpv is currently open, you will need to relaunch it in order for your script(s) to take effect.
#
Skins
You can customize how mpv looks using skins. These are subject to personal preference, so find what works best for you.
Below is a list of some popular skins: