#
Muxing
Matroska is a very versatile container. Matroska is usually found as .mkv files (Matroska video), .mka files (Matroska audio), .mks files (subtitles). It can contain multiple streams of video, audio, subtitles, and other attachments. The process of taking these streams, adding or removing some, and bundling them into a new file is called muxing or multiplexing. Muxing is a lossless process and takes only a few seconds. In general, you could be muxing any format, but for anime we'll mostly be dealing with mkv. It's useful when you want to use subtitles from a different release with what you already have downloaded, or to remove the extra english audio tracks to save space.
#
MKVToolNix
MKVToolNix is a set of tools to create, alter and inspect Matroska & WebM files under Windows, macOS, Linux and other Unices. It is the de-facto reference implementation of a Matroska multiplexer.
MKVToolNix consists of the following command-line tools:
mkvmergeis a tool to create Matroska & WebM files from other formats.mkvinfoallows one to get information about the tracks in Matroska & WebM files.mkvextractcan extract tracks from Matroska & WebM files to other formats.mkvpropeditcan edit properties such as header and chapter information or attachments without remuxing.
On top of them sits MKVToolNix GUI, an easy-to-use program making the functionality of those command-line tools available as a GUI.
#
Getting started
After installing MKVToolNix, you're pretty much ready to go. Once you launch it, you'll be greeted with this. You'll see 3 tabs here:
Inputtab for adding your files, modifying existing tracks, adding/removing tracks and more.Outputtab for adding metadata like file title or chapters.Attachmentstab for additional attachments, commonly used for adding fonts required by the subtitle tracks and things like cover.
Screenshot 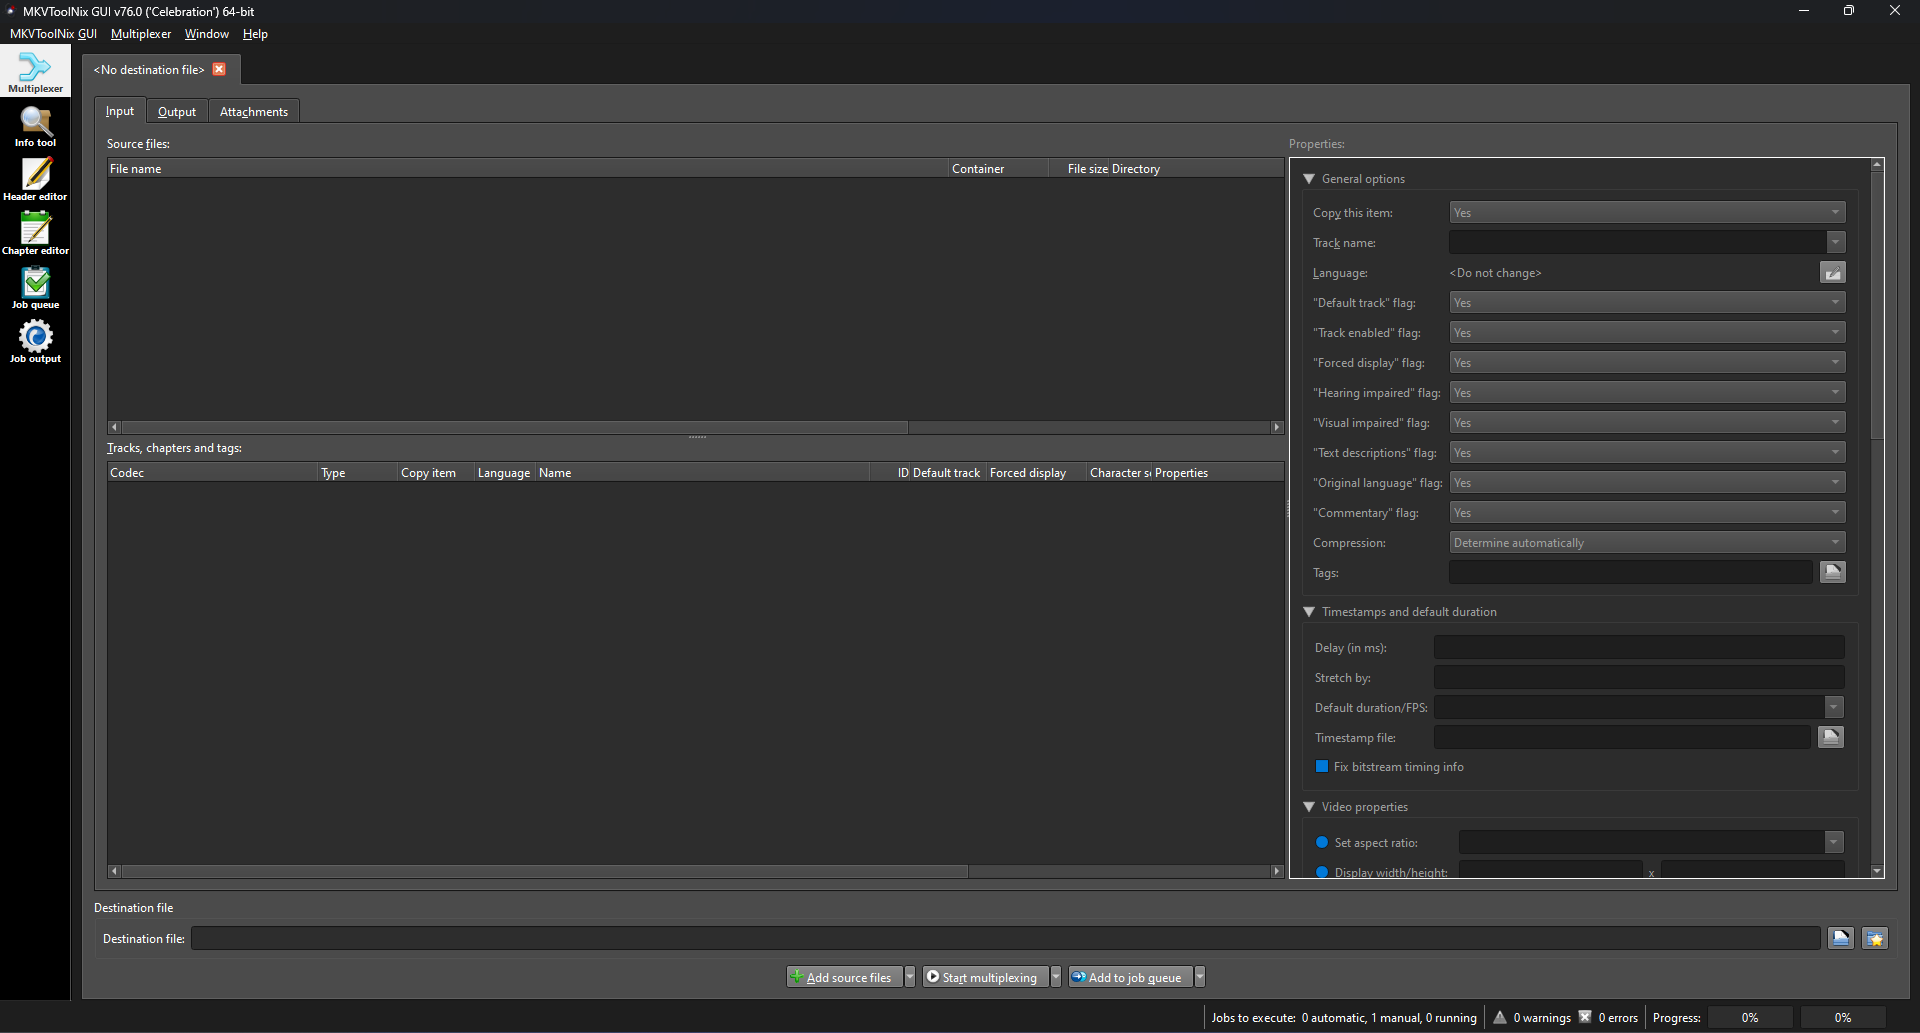
When you first add a file in MKVToolNix, you'll get a popup to select its behavior.
- Select
Add as new source files to the current multiplex settings - Check
Always use the action selected above and don't ask again - Click
OK
Screenshot 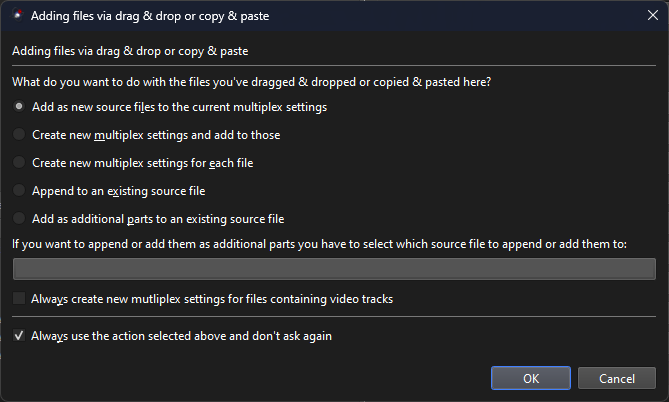
- Select
Now, You can either right-click anywhere in the top "Source Files" box or drag and drop your file in it.
- Once you add your source file, all the tracks in your file will show up in the box below, along with other relevant things in each tab.
- Tracks will be randomly assigned a color to indicate what source they belong to.
- Checking or unchecking a track will decide if it'll be kept or removed in the output file.
- By default, anything you won't explicitly uncheck will be copied over to the new output file.
- Clicking on any track allows you to modify several properties in the window on the right. It's important you get this right and it's covered in more details
below .
Screenshot 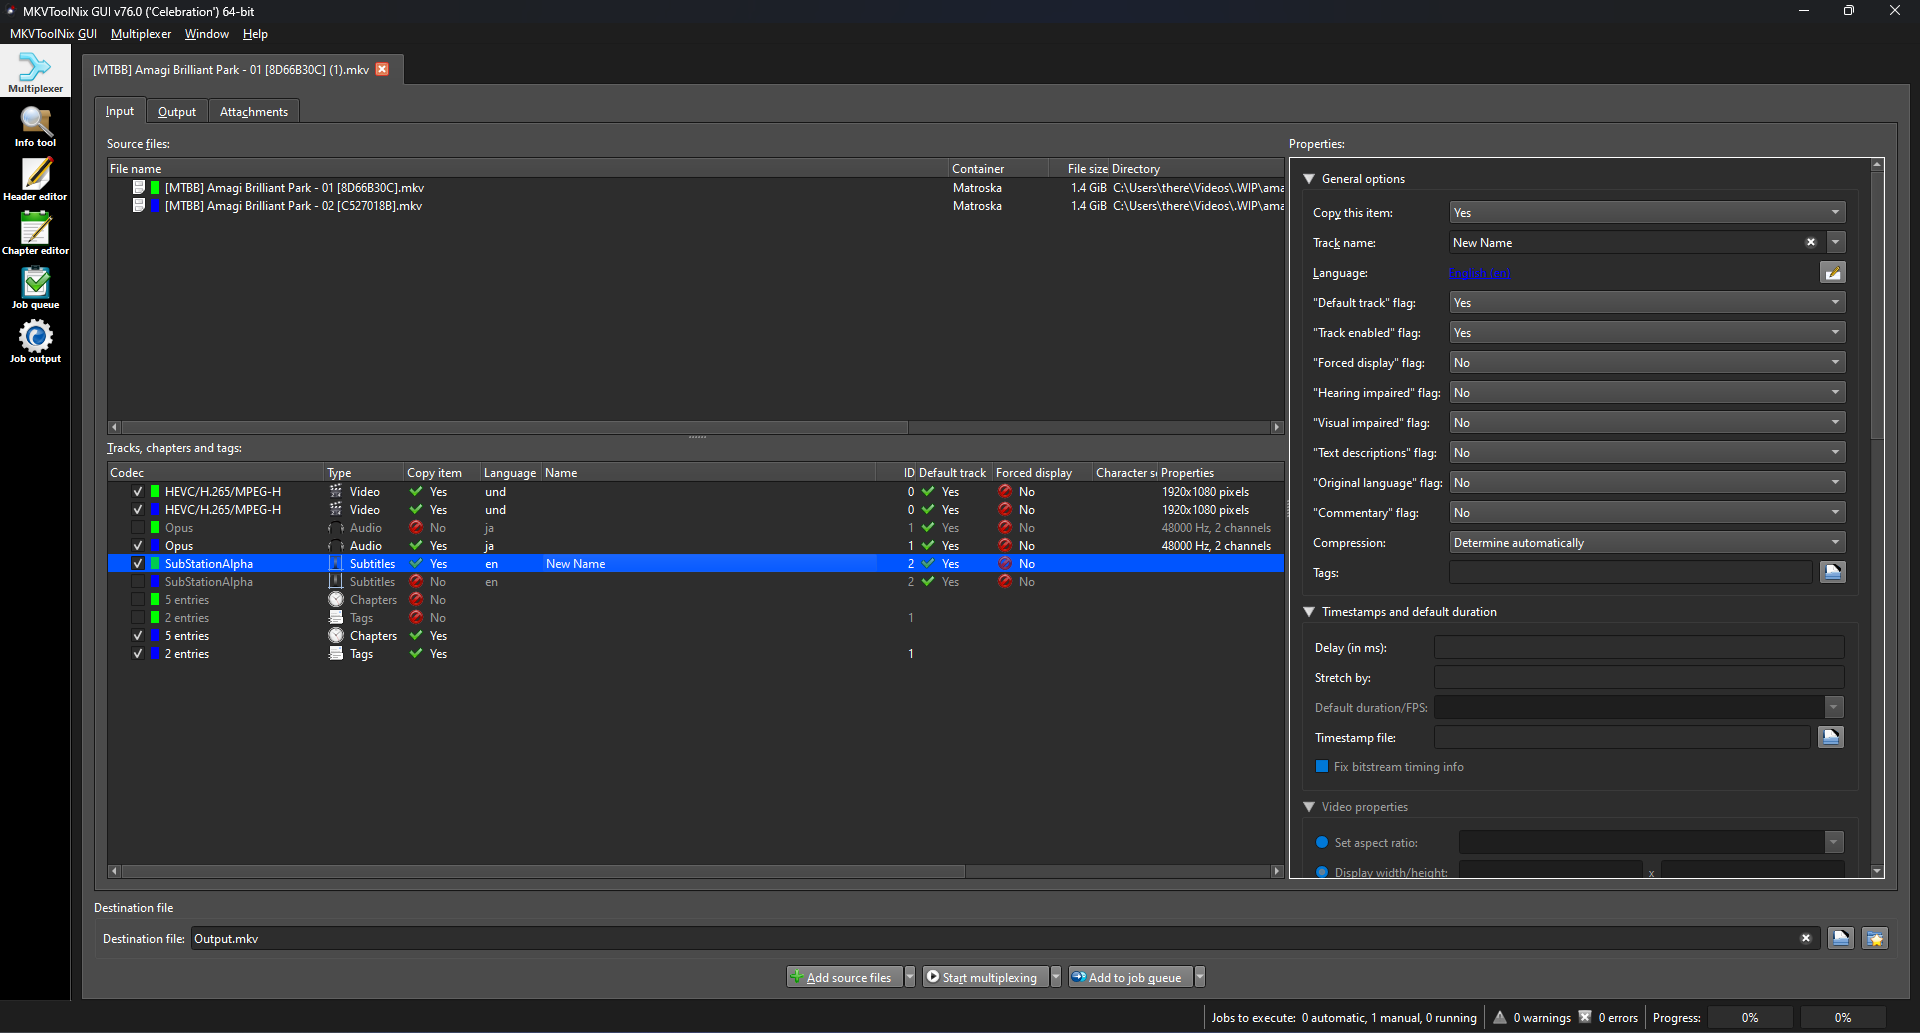
Once you're done making your changes, assign a name to your file and hit
Start multiplexing. Make sure to check all 3 tabs to ensure what's being copied over.Screenshot 
MKVToolNix also allows you to generate a commandline with all the changes you made in the GUI.
#
Default Track Selection
When muxing releases, you'll want to make sure you understand how the default track selection works. These examples are given to help you understand this as defined by the Matroska spec, and is modified to reflect anime release conventions, and may not reflect all possible cases.
Example track set:
This is a file that has 6 audio tracks, 3 of which are Japanese (which is tagged as the original language) and 3 of which are English.
If the player supports it and the user has specified it as a preference, the player will automatically select one of the audio tracks that are tagged as the original language.
If the player has support for automatically selecting visual-impaired audio tracks and the user has set a preference for it, it will select the track that matches that preference if it matches the language preference of the user as well.
If no tracks are automatically selected based on the above rules,
it will look at the remaining tracks tagged as Default.
In this example, that would be the 2nd, 3rd, 5th, and 6th tracks.
The only differences between these tracks are the language and the channel layout.
If the user has a channel layout preference, it will select the first track of the group that matches that preference.
Finally, if no other preferences are set or match the existing tracks, it will select the first track in this group.
Example track set:
Here is a file that has 2 audio tracks and 7 subtitle tracks for 3 different languages. The original language is Japanese, and the release includes an English dub track.
If the player supports it and the user has specified it as a preference, the player will automatically select the audio track tagged as the original language. In this example, that would be the Japanese audio track.
Japanese/Original Language Audio:
If the user has no preferences set for subtitle tracks, the player is not required to select a subtitle track. However, some players may still automatically select a subtitle track based on the rules outlined below.
If the user has set preferences for both original language subtitles and hearing-impaired tracks, the player will select the Japanese closed captions track (track 8), since it's tagged as both the original language and as hearing-impaired. Even if the track weren't explicitly tagged as the original language, the player should assume it matches the original language since it's the same language as the audio track.
Since there are no Japanese subtitle tracks tagged as Forced,
the only remaining tracks eligible for auto-selection
are the full English (track 4) and German (track 9) subtitle tracks.
The player will select based on the user's language preference:
- English subtitles preferred -> selects the English track
- German subtitles preferred -> selects the German track
- No language preference -> selects the first track in the group (English track)
Dub Audio:
When the player auto-selects the English dub audio track,
it will also automatically select the English forced subtitle track (Signs & Songs),
since it's tagged as Forced and matches the audio language.
However, if the user has set preferences that override other subtitle tracks of the same language (such as preferring hearing-impaired subtitles), the player will always prioritize the track that matches those preferences instead.
#
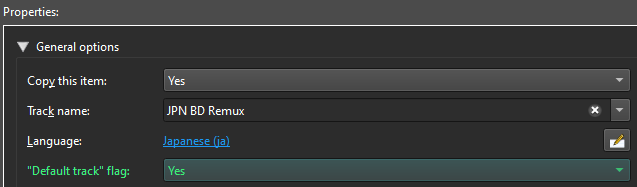
Correct Tagging
The Properties tab in MKVToolNix allows you to tag each track with various flags.
Tagging a track correctly is very important
because it enables players to automatically select the correct language streams for audio and subtitles.
Tags can be edited in MKVToolNix or mkvpropedit without remuxing.
The following suggestions assume you're working with an average anime release. If you're working with a different format, you should apply the suggestions accordingly.
- Name: Optionally set the track name to the
Encoder/Groupor source region (e.g.,JPNBD,ITABD). - Language: Set to
und. While you could use the source region's language, it's not well-documented how players interpret this, so it's safer to useund.
- Name: Include the codec, channels, and optionally the bitrate if applicable (e.g.,
FLAC 5.1,Opus 2.0 @ 192kb/s). - Default: Tag regular audio tracks as
Default.- Specialized tracks (commentary, SDH, etc.) must be tagged with their respective flags and not as
Default.
- Specialized tracks (commentary, SDH, etc.) must be tagged with their respective flags and not as
- Forced: Audio tracks must not be tagged as
Forced. - Language: Must reflect the spoken language. Use
zxxif there is no discernible language.- For multiple dialects, use the correct dialect tag (e.g.
es-ESfor Castilian Spanish,es-419for Latin American Spanish) and indicate the dialect in theNamefield.
- For multiple dialects, use the correct dialect tag (e.g.
- Original Language: Tag the original audio language as
Original language. For anime, this is typically the Japanese audio tracks.- Also apply this tag to commentary, descriptive, or other specialized audio tracks in the same language.
- Language: Must reflect the subtitle language.
- For multiple dialects, use the correct dialect tag and mention it in the
Namefield (e.g.,es-ESfor Castilian Spanish,es-419for Latin American Spanish).
- For multiple dialects, use the correct dialect tag and mention it in the
- Default: Regular subtitle tracks (
Full Subtitles) must be tagged asDefault.- If no subtitle tracks should be auto-selected (except
Forcedand special tracks), mark none asDefault. - Specialized tracks (commentary, SDH, etc.) must be tagged with their respective flags and not as
Default. - Closed captions must be tagged as
Hearing impaired.
- If no subtitle tracks should be auto-selected (except
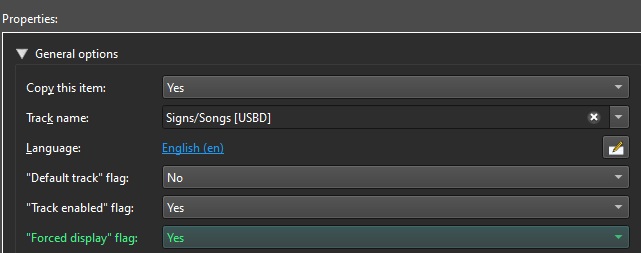
- Forced: The forced track (
Signs & Songs) must be tagged asForced.- This track should not be tagged as
Defaultsince it's specialized for use with dubs. - The language tag must match the audio track it's intended for. If the dub language is English, the language tag for its Signs & Songs must also be
eng. - Use only one
Forcedtrack per language.
- This track should not be tagged as
- Honorifics and other similar alternative tracks: Tag as
enmandDefault, but notForced.- Note: This isn't a Matroska standard but a widely accepted convention in the anime community. Commercial software like Plex supports this convention.
- Original Language: Tag subtitle tracks that match the original language audio track. For anime, this is typically a closed captions track.
Track order determines which track will be automatically selected by the player when all tracks are correctly tagged and the user has no specific preferences set.
Tracks should be grouped by language, with the regular track first within each language group.
The recommended track order is:
- Video
- Original language audio group
- Original language regular audio
- Original language specialized audio (commentary, descriptive, etc)
- Dub audio group
- Regular dub audio
- Specialized dub audio (commentary, descriptive, etc)
- Subtitle group related to Original audio
- Regular subtitle tracks for regular original audio
- Specialized subtitle track for audio tracks in the original audio group
- Subtitle group related to dub audio
- Regular subtitle tracks for the regular dub audio
- Specialized subtitle track for audio tracks in the dub audio group (forced, commentary, sdh, etc)
MKVToolNix will sort track types (video, audio, subtitles) in the correct order by default in the UI. However, it will not automatically arrange the tracks within each language group.
For multiple "regular" tracks of the same language
(e.g., Japanese 2.0 and Japanese 5.1 tracks),
these will be tagged identically.
In this case,
players typically fall back to track order for selection.
It's up to personal preference which track should go first,
but it's recommended to either put the "original" audio track first
(in the case of a 2.0 downmix or 5.1 upmix),
or the most well-supported track (typically the 2.0 track).
For more advanced examples, refer back to the
#
Related Info
This flag DOES NOT mean that a subtitle track will be permanently on the screen, which is a common misconception. Forced subtitles only provide subtitles when the characters speak a foreign or alien language, or a sign, flag, or other text in a scene is not translated in the localization and dubbing process. For anime, its purpose is to display subtitles whenever the English dub has untranslated things like Japanese Signs and Songs like Opening/Ending or Inserts.
This flag DOES NOT mean that a track is the default choice during playback, but instead it's a hint for the player that a given track SHOULD be eligible to be automatically selected as the default track for the given language. If no tracks in a given language have the default track flag set, then no subtitle tracks will be automatically selected unless there is an accompanying Forced track for the selected audio track.
This flag is used to indicate that a track provides “regular service” suitable for users with default settings, as opposed to specialized services such as commentary, hearing-impaired captions, or descriptive audio.
The latest version of each player was tested on 2025-12-28
Everything covered in this section is a simplified version of the full spec, which you can read here if you want to.
#
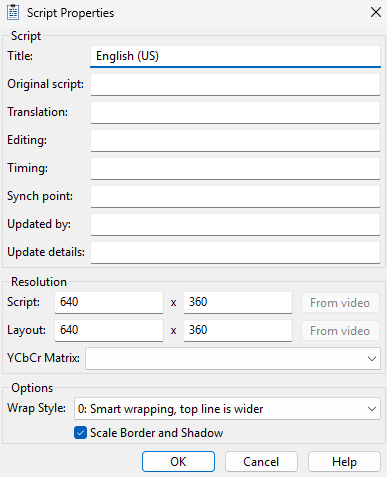
Adding LayoutRes to ASS Files
When working with ASS subtitle files, it's a good idea to explicitly add the LayoutResX and LayoutResY headers to ensure your subtitles display correctly. Here are three common cases to consider:
Typically, you'll want
LayoutResXandLayoutResYto matchPlayResXandPlayResYfor newly authored subtitles.If
LayoutResXandLayoutResYare already set and they differ fromPlayResXandPlayResY, it's best to keep the difference as-is. However, avoid creating new files with differing values.For older files that don't have
LayoutResXandLayoutResY, you should make an educated guess. One approach is to set these values to matchPlayResXandPlayResYor the storage size of the video, depending on which seems more appropriate for the situation. If you cannot make an educated guess, it's better to skip settingLayoutResXandLayoutResYto avoid potential layout issues.
To set LayoutResX and LayoutResY in Aegisub, follow these steps:
- Open your subtitle file in Aegisub.
- Go to the menu bar and click on
File. - From the drop-down menu, select
Properties. - In the
Script Propertieswindow, you will see fields forScript(PlayRes) andLayout(LayoutRes). - Set the appropriate values and click
OK.
As of writing this, you need the git master build of arch1t3cht/Aegisub to edit LayoutRes.
#
Fonts
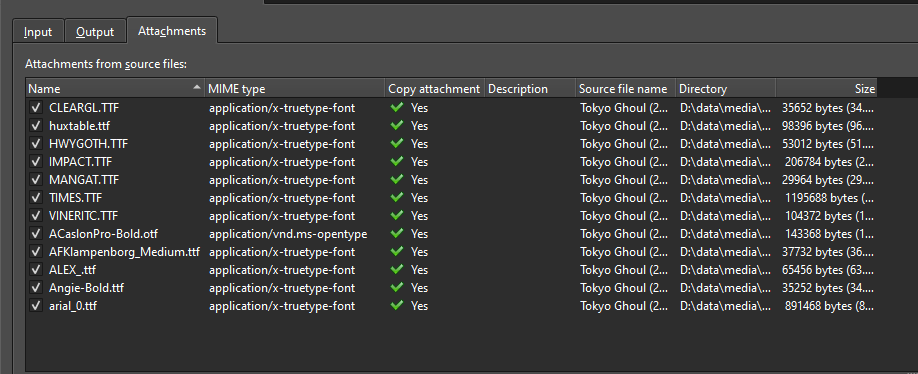
Fonts used by the .ass subtitles must be attached to the .mkv file for displaying subtitles accurately on the user's end. This can be easily done by dragging the fonts used by the .ass file into the attachments tab. You can usually source the correct fonts from the same fansub release you got the subtitles from. Alternatively, dropping the original fansub release in MKVToolNix will automatically carry over all the fonts in it. You can also get the fonts used by the .ass file with Aegisub or FontCollector if you have them on your system already.
#
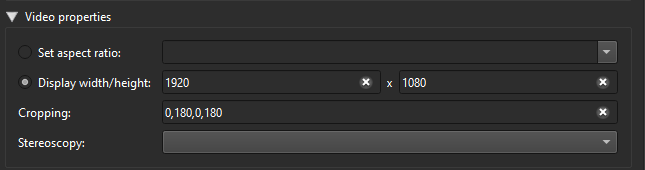
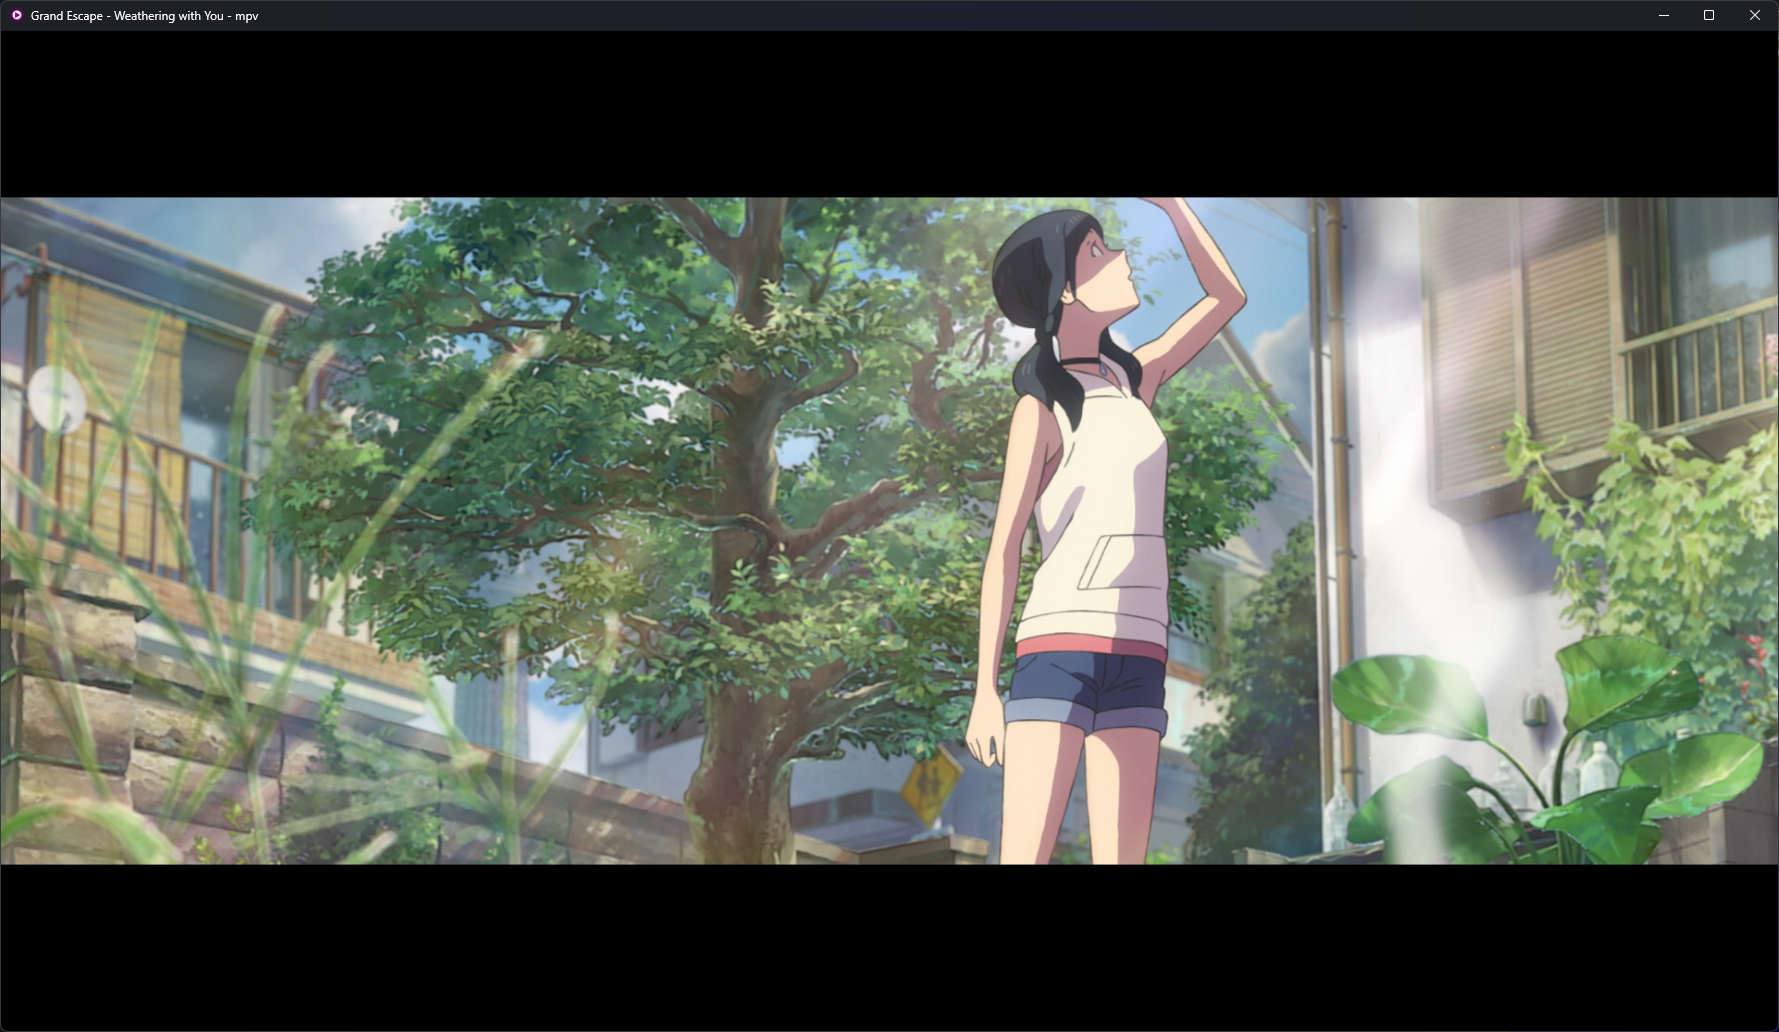
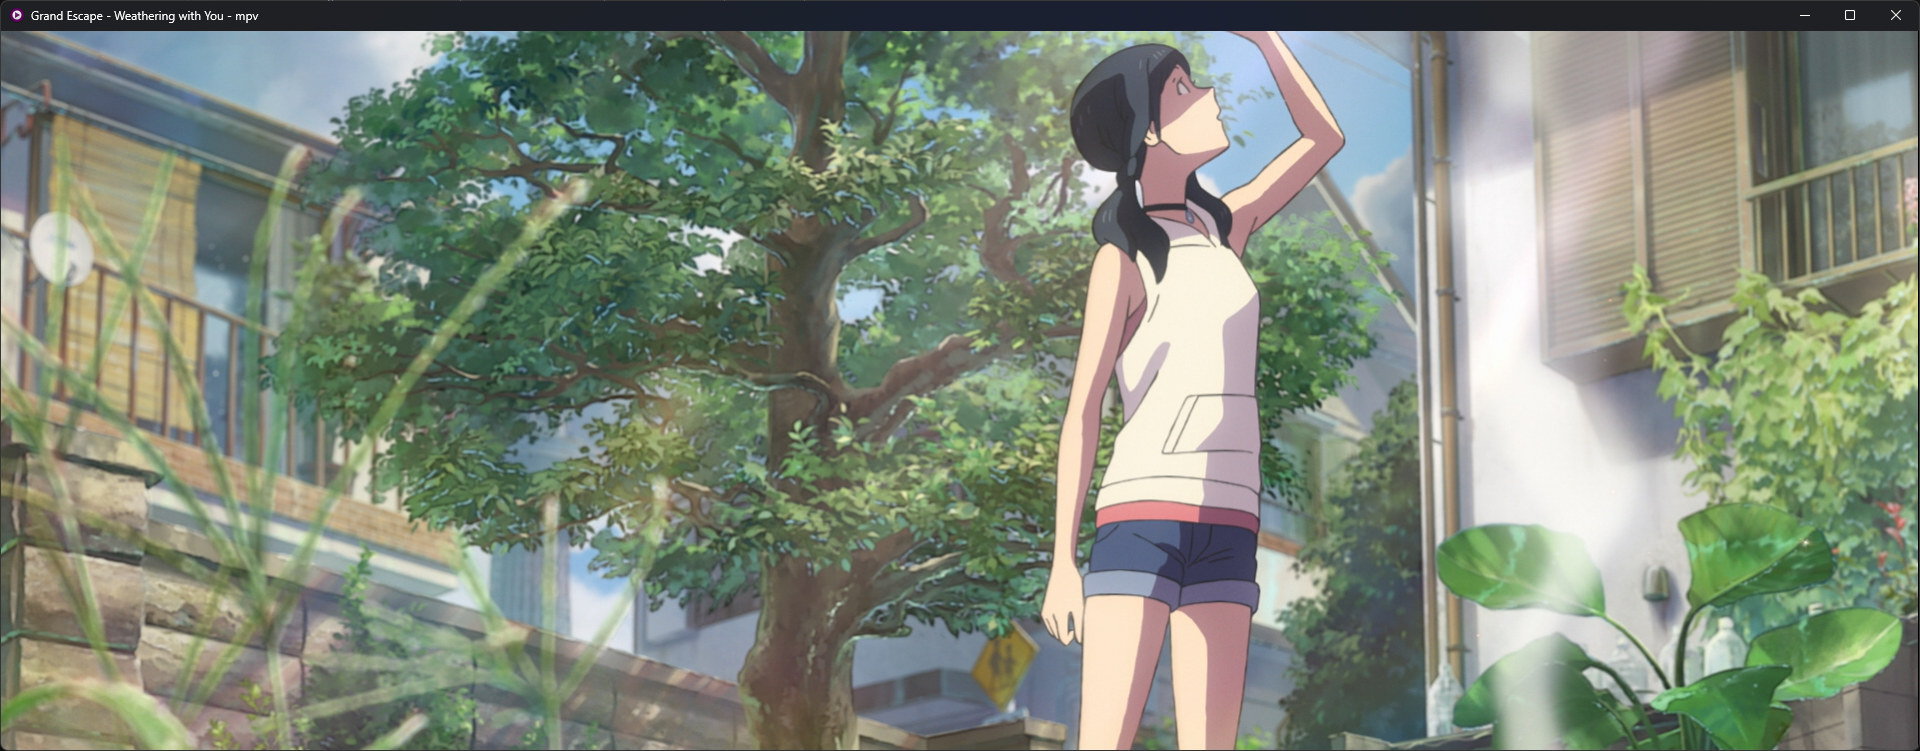
MKV Cropping
MKVToolNix allows you to set crop values for the video stream. This is quite helpful for cropping black bars without re-encoding. Players that support MKV crop values, such as mpv, will display the video as intended (without black bars), while players that do not support these values will continue to play it normally (with black bars) without any adverse effects.
Advantages of cropping and why you should do it:
- Cropping black bars allows the video to fill the entire screen. A couple of common examples would be letterboxed content on ultrawide displays or pillarboxed content on 4:3 displays, where black bars would otherwise prevent the video from filling the entire screen
- On 16:9 displays where cropping would result in black bars regardless, it's still beneficial because it avoids dirty lines caused by scaling
You must check that the aspect ratio is consistent throughout the entire file and only crop the smallest value. It's possible that the video might switch aspect ratio during its runtime, in which case a careless crop can result in the unintended removal of content. Thoroughly check for such changes before making any adjustments.
#
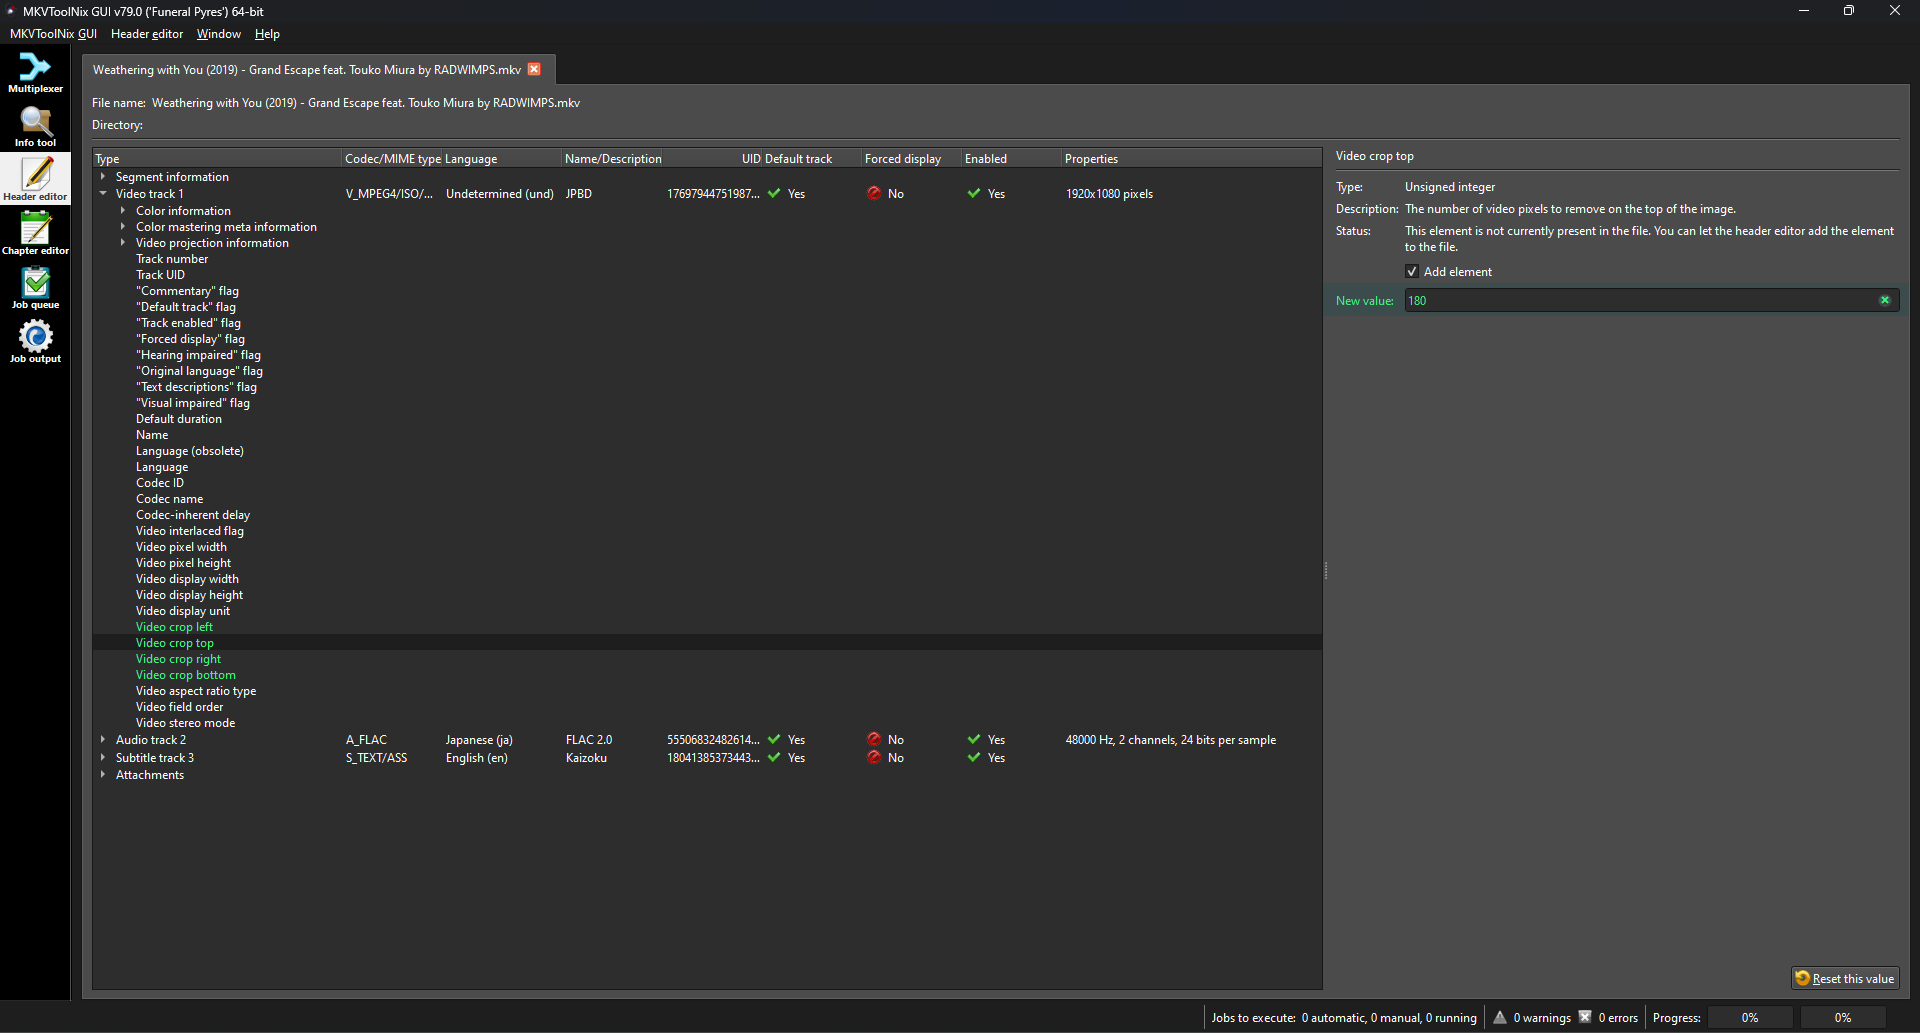
Two ways to crop
- Click on the video stream in MKVToolNix GUI
- Go to the
Propertiestab on the right, and then navigate to theVideo Properties - Enter your crop values in the format
LEFT, TOP, RIGHT, BOTTOM, i.e,0,180,0,180to crop180pixels from top and bottom.
- Open
Header Editorin the left pane - Add your file
- Navigate to the Video track's properties
- Adjust them as needed and then press
CTRL+Sto save without remuxing the file
Uncropped
MKV Cropped
#
Container Delays

MKVToolNix allows you to set positive or negative delays on each track in order to synchronize them with the designated video track. This is usually the easiest way to sync different tracks together, but you should be careful with it. Avoid delays exceeding 1001ms, as they may lead to playback problems on different media players. Instead, consider syncing each track using their specific tools and only utilize container delays for smaller adjustments as a final resort.
The only exception to this is TrueHD audio, where container delay is your only option. Multi-channel TrueHD streams contain alternative presentations (downmixes): 2.0, 5.1 and 7.1. These are embeded either as discrete channels or derived through custom coefficients.
These alternative presentations are lost once decoded, even if they were to be encoded/transcoded back to TrueHD.
#
QoL stuff
This is commonly seen in WEB-DL releases.
The --add-track-statistics-tags option calculates statistics for all tracks in a file and adds new statistics tags for them. If the file already contains such tags then they'll be updated. The other options are pretty self-explanatory.
mkvpropedit "file.mkv" --tags all: --add-track-statistics-tags --edit info --delete date --set muxing-application="" --set writing-application=""for %X IN (*.mkv) do mkvpropedit "%X" --tags all: --add-track-statistics-tags --edit info --delete date --set muxing-application="" --set writing-application=""for file in *.mkv; do mkvpropedit "$file" --tags all: --add-track-statistics-tags --edit info --delete date --set muxing-application="" --set writing-application=""; donemkv file without remuxing
This is an example, you'll have to edit the command further to apply to your specific file. If your filename has a CRC in it, you must also update that to reflect the new CRC.
for %X in (*.mkv) do mkvpropedit "%X" --add-track-statistics-tags --edit info --delete title ^
--edit track:v1 --set name="Encode Group"              --set language=jpn --set flag-default=1 ^
--edit track:a1 --set name="FLAC 2.0"                  --set language=jpn --set flag-default=1 ^
--edit track:a2 --set name="Opus 5.1 @ 320kb/s"        --set language=eng --set flag-default=1 ^
--edit track:s1 --set name="Full Subtitles [Fansub]"   --set language=eng --set flag-default=1 --set flag-forced=0 ^
--edit track:s2 --set name="Honorifics [Fansub]"       --set language=enm --set flag-default=1 --set flag-forced=0 ^
--edit track:s3 --set name="Signs & Songs [Fansub]"      --set language=eng --set flag-default=0 --set flag-forced=1 ^
--edit track:s4 --set name="Full Subtitles [Official]" --set language=spa --set flag-default=1 --set flag-forced=0
for file in *.mkv; do
mkvpropedit "${file}" --add-track-statistics-tags --edit info --delete title \
--edit track:v1 --set name="Encode Group" --set language=jpn --set flag-default=1 \
--edit track:a1 --set name="FLAC 2.0" --set language=jpn --set flag-default=1 \
--edit track:a2 --set name="Opus 5.1 @ 320kb/s" --set language=eng --set flag-default=1 \
--edit track:s1 --set name="Full Subtitles [Fansub]" --set language=eng --set flag-default=1 --set flag-forced=0 \
--edit track:s2 --set name="Honorifics [Fansub]" --set language=enm --set flag-default=1 --set flag-forced=0 \
--edit track:s3 --set name="Signs & Songs [Fansub]" --set language=eng --set flag-default=0 --set flag-forced=1 \
--edit track:s4 --set name="Full Subtitles [Official]" --set language=spa --set flag-default=1 --set flag-forced=0
done