#
Comparison
Quality comparisons are frequently used within the enthusiast community to compare the video quality offered by different sources/releases. It serves as a great way to distinguish the differences between good and bad sources, and can help you identify video issues and determine which one to keep.
This guide goes through the process of setting up and effectively utilizing VSPreview, a previewer utility for VapourSynth, to produce useful quality comparisons that will allow you to ascertain which video offers the best visual experience.
#
Setup
#
VapourSynth
VapourSynth is an open-source video processing framework. It handles all of your sources, playback, and filtering options in conjunction with VSPreview.
#
Dependencies
- Python 3.12.x - Download the latest 3.12 version at the bottom and select
Add python.exe to PATHduring installation - Git - Spam next during installation
#
Installation
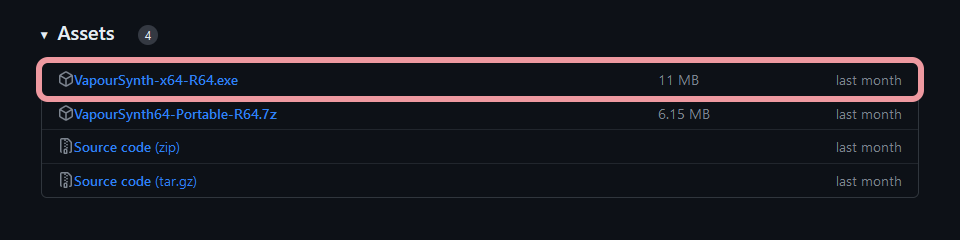
Download and install the latest VapourSynth-x64-RXX.exe from VapourSynth. During installation, select Install for me only.
#
VSPreview
VSPreview is a previewer application for scripts created in VapourSynth. It features a simple graphical interface to allow you to use VapourSynth's features (and create comparisons) with ease.
#
Dependencies
In order to create comparisons with VSPreview, you will need a few necessary dependencies:
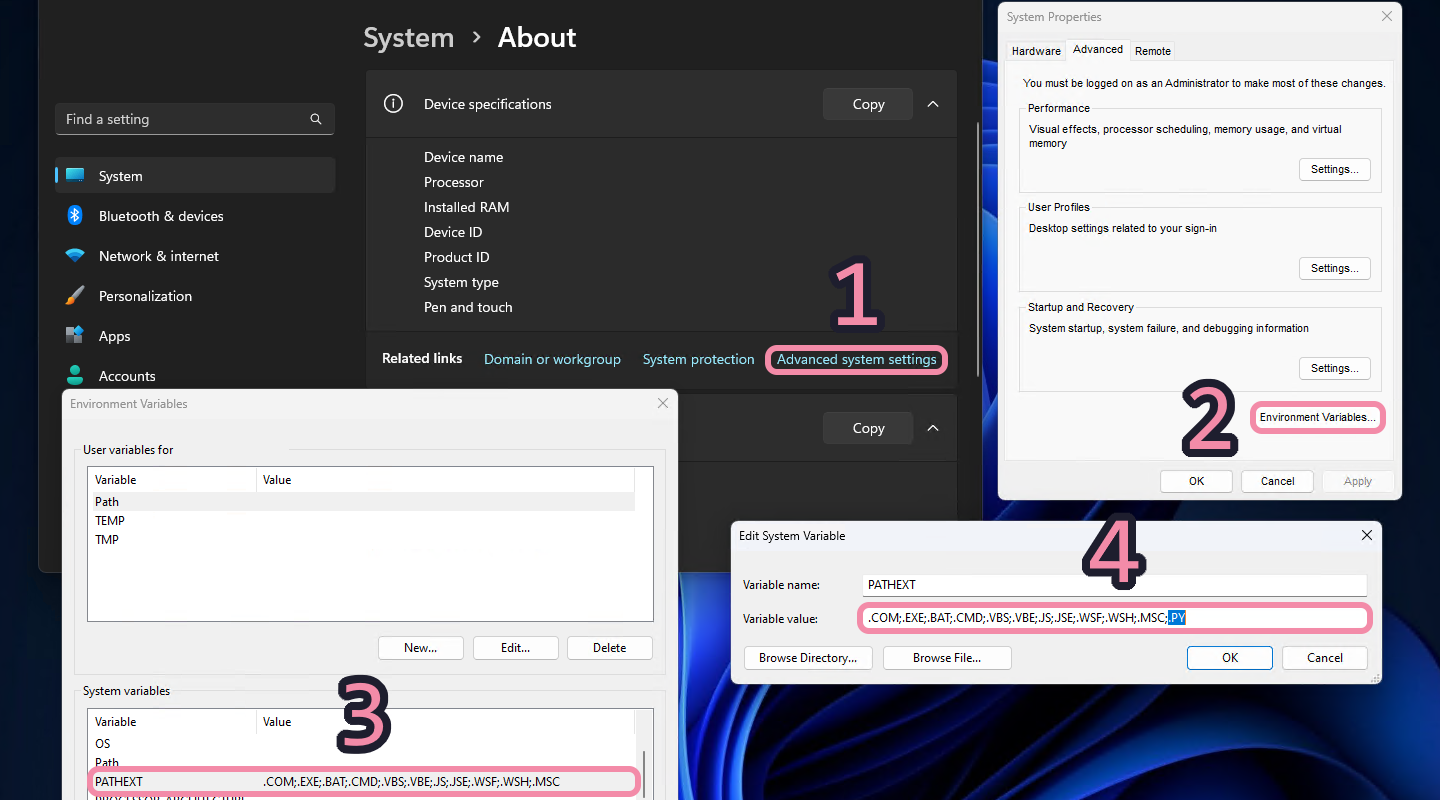
ffms2,fpng,LibP2P,LSMASHSource, andvs-placebocan be installed usingvsrepofrom VapourSynth. In your terminal, run the following:vsrepo.py install ffms2 fpng libp2p lsmas placeboIf
vsrepo.pycommand doesn't work, make sure Windows is set to open.pyfiles with Python. You may also need to add it to thePATHEXTenvironment variable.awsmfunccan be installed usingpip:python -m pip install git+https://github.com/OpusGang/awsmfunc.git
#
Installation
If you have the previous vs-jet packages installed, please follow the instructions on vs-jet page to uninstall them. You need to do this before installing the newer vs-jetpack package.
Download and install vs-jetpack and vs-preview using pip in your terminal:
python -m pip install vsjetpack vspreview
#
Usage
#
Scripting
In order to create a comparison, you will need to create a VapourSynth script. This script outlines the parameters and files which VSPreview will use when generating your comparison.
Create a file called comp.py. Launch it in your favorite text editor and add sections as desired:
The following comp.py script loads your sources into the previewer.
Make sure to comment (add ## to the beginning of the line) and uncomment lines as needed.
## Dependencies: Allows vspreview to run [required; do not remove]
from vstools import vs, core
from vskernels import Hermite, EwaLanczos
from vspreview import set_output

## <Additional dependencies>
## Place any additional dependencies you want to use in your comp here
## <End of additional dependencies>

## File paths: Hold shift and right-click your file, select copy as path, and paste it here. For NF WEB-DLs change core.lsmas.LWLibavSource to core.ffms2.Source
clip1 = core.lsmas.LWLibavSource(r"C:\Paste\File\Path\Here.mkv")
clip2 = core.lsmas.LWLibavSource(r"C:\Paste\File\Path\Here.mkv")
clip3 = core.lsmas.LWLibavSource(r"C:\Paste\File\Path\Here.mkv")

## Source: Name of the source
source1 = "FirstSourceName"
source2 = "SecondSourceName"
source3 = "ThirdSourceName"

## <Additional comp settings>
## Place any additional settings you want to use in your comp here
## <End of additional comp settings>

## Output: Comment/uncomment as needed depending on how many clips you're comparing
set_output(clip1, name=source1)
set_output(clip2, name=source2)
set_output(clip3, name=source3)
#
Frame Rate
Sets the source frame rate (fps) based on fractional input (fpsnum/fpsden). For example, fpsnum=24000 and fpsden=1001 forces the clip frame rate to 23.976 fps. This should be used on sources that have different frame rates that don't automatically stay in sync.
If a clip stays in sync without changing during scrubbing, you should note that the specific source has dropped or duplicate frames.
## Frame rate: Change fps to match other sources (needed for when the previewer is unable to automatically keep them in sync)
clip1 = core.std.AssumeFPS(clip1, fpsnum=24000, fpsden=1001)
clip2 = core.std.AssumeFPS(clip2, fpsnum=25000, fpsden=1000)
clip3 = core.std.AssumeFPS(clip3, fpsnum=24000, fpsden=1000)
#
FieldBased
Sets interlaced flagged content that may be progressive as progressive for higher quality chroma upscaling.
## FieldBased: Tags the content as progressive (0); used for progressive content tagged as interlaced
clip1 = core.std.SetFieldBased(clip1, 0)
clip2 = core.std.SetFieldBased(clip2, 0)
clip3 = core.std.SetFieldBased(clip3, 0)
#
Inverse Telecine
Quick inverse telecine filter for converting telecined clips (usually 30 fps interlaced video) back to the original framerate (24 fps progressive).
vivtc needs to be installed in order for the following snippet to work. You can install it with vsrepo.py install vivtc.
## Inverse telecine: Fixes telecined video
clip1 = core.vivtc.VFM(clip1, 1)
clip1 = core.vivtc.VDecimate(clip1)
#
Cropping
Crops the source video by n pixels from the selected side. For example, left=20 will remove 20 horizontal pixels starting from the left side. This should be used on sources that use letterboxing or other form of borders.
If you are cropping with odd numbers, you will need to convert your clip to 16-bit depth with 4:4:4 chroma subsampling. (see
## Cropping: Removes letterboxing (black bars) [16-bit required for odd numbers]
clip1 = core.std.Crop(clip1, left=240, right=240, top=0, bottom=0)
clip2 = core.std.Crop(clip2, left=0, right=0, top=276, bottom=276)
clip3 = core.std.Crop(clip3, left=0, right=0, top=21, bottom=21)
Make sure to check for variable aspect ratios throughout the file and only crop the smallest border. We recommend using ShareX for quickly calculating border size.
#
Scaling
Downscales or upscales the video. This should be used to match sources that have differing resolutions.
For upscaling (e.g. 720p -> 1080p), use
EwaLanczos:## Upscaling: Increases the resolution of clips to match the highest resolution using EwaLanczos (equivalent scaling to mpv's high-quality profile); recommended clip1 = EwaLanczos.scale(clip1, 1920, 1080, sigmoid=False) clip2 = EwaLanczos.scale(clip2, 1920, 1080, sigmoid=False) clip3 = EwaLanczos.scale(clip3, 3840, 2160, sigmoid=False)For downscaling (e.g. 2160p/4K -> 1080p), use
Hermite:## Downscaling: Decreases the resolution of clips to match the lowest resolution using Hermite (equivalent scaling to mpv's high-quality profile); not recommended clip1 = Hermite.scale(clip1, 1920, 1080, linear=True) clip2 = Hermite.scale(clip2, 1920, 1080, linear=True) clip3 = Hermite.scale(clip3, 3840, 2160, linear=True)
Downscaling is generally not recommended. We suggest upscaling your sources to match the highest resolution unless you have a specific reason (e.g. comparing how a higher resolution file would look on a lower resolution display).
#
Trimming
Removes the first n frames from the source. For example, [24:] will skip the first 24 frames and start the source at frame 25. This should be used on sources that are out of sync.
To get the frame difference, find a unique frame (e.g. scene changes) in the correct and incorrect source. Note the frame numbers each one begin at, then set the difference of the two for the incorrect source.
## Trimming: Trim frames to match clips (calculate the frame difference and enter the number here)
clip1 = clip1[0:]
clip2 = clip2[24:]
clip3 = clip3[0:]
For more advanced trimming such as chaining, splicing, and looping, see Vapoursynth's docs.
#
Depth
Converts clips to 16-bit depth with 4:4:4 chroma subsampling. Required for filters such as cropping (with odd numbers) or tonemapping.
## Depth: Convert clips to 16-bit 4:4:4 [required for cropping with odd numbers or tonemapping]
clip1 = core.resize.Lanczos(clip1, format=vs.YUV444P16)
clip2 = core.resize.Lanczos(clip2, format=vs.YUV444P16)
clip3 = core.resize.Lanczos(clip3, format=vs.YUV444P16)
#
Debanding
Applies a debanding filter to the selected clip(s).
Sources with clear banding should be debanded to see how they fare when watching with a deband applied, such as using mpv's built-in deband filters. The debanded clip should never replace the original. Instead, it should be added as an additional node. Debands higher than default should only be used in extreme cases.
## Convert clips to 32-bit for precision
clip1 = vstools.depth(clip1, 32)
clip2 = vstools.depth(clip2, 32)
clip3 = vstools.depth(clip3, 32)

default_mpv_deband = core.placebo.Deband(clip1, planes=7, iterations=4, threshold=3.44, radius=16.0, grain=0.5)
brazzers_deband = core.placebo.Deband(clip2, planes=7, iterations=4, threshold=5.0, radius=20.0, grain=0.5)
hiroshima_deband = core.placebo.Deband(clip3, planes=7, iterations=4, threshold=7.0, radius=8.0, grain=0.5)

default_mpv_deband = vstools.depth(default_mpv_deband, 8)
brazzers_deband = vstools.depth(brazzers_deband, 8)
hiroshima_deband = vstools.depth(hiroshima_deband, 8)

set_output(default_mpv_deband)
set_output(brazzers_deband)
set_output(hiroshima_deband)
You can find the equivalent deband settings for mpv here.
#
Tonemapping
Converts the dynamic range of the source (i.e. HDR/DV -> SDR).
- For converting HDR (washed out colors) -> SDR, set
source_colorspace=ColorSpace.HDR10 - For converting DV (green/purple hue) -> SDR, set
source_colorspace=ColorSpace.DOVI
If you want to use tonemapping, you will need to change the color depth to 16-bit (see
## Additional imports [Paste these at the very top of your script]
from awsmfunc.types.placebo import PlaceboColorSpace as ColorSpace
from awsmfunc.types.placebo import PlaceboTonemapFunction as Tonemap
from awsmfunc.types.placebo import PlaceboGamutMapping as Gamut
from awsmfunc.types.placebo import PlaceboTonemapOpts

## Tonemapping: Converts the dynamic range of the source [16-bit required]
## Specify the arguments based on your sources; play with different values when comparing against an SDR source to best match it
clip1args = PlaceboTonemapOpts(source_colorspace=ColorSpace.DOVI, target_colorspace=ColorSpace.SDR, tone_map_function=Tonemap.ST2094_40, gamut_mapping=Gamut.Clip, peak_detect=True, use_dovi=True, contrast_recovery=0.3)
clip2args = PlaceboTonemapOpts(source_colorspace=ColorSpace.HDR10, target_colorspace=ColorSpace.SDR, tone_map_function=Tonemap.ST2094_40, gamut_mapping=Gamut.Clip, peak_detect=True, use_dovi=False, contrast_recovery=0.3)
clip3args = PlaceboTonemapOpts(source_colorspace=ColorSpace.HDR10, target_colorspace=ColorSpace.SDR, tone_map_function=Tonemap.Spline, gamut_mapping=Gamut.Darken, peak_detect=True, use_dovi=False, contrast_recovery=0.3, dst_max=120)

## Apply tonemapping
clip1 = core.placebo.Tonemap(clip1, **clip1args.vsplacebo_dict())
clip2 = core.placebo.Tonemap(clip2, **clip2args.vsplacebo_dict())
clip3 = core.placebo.Tonemap(clip3, **clip3args.vsplacebo_dict())

## Retag video to 709 after tonemapping [required]
clip1 = core.std.SetFrameProps(clip1, _Matrix=vs.MATRIX_BT709, _Transfer=vs.TRANSFER_BT709, _Primaries=vs.PRIMARIES_BT709)
clip2 = core.std.SetFrameProps(clip2, _Matrix=vs.MATRIX_BT709, _Transfer=vs.TRANSFER_BT709, _Primaries=vs.PRIMARIES_BT709)
clip3 = core.std.SetFrameProps(clip3, _Matrix=vs.MATRIX_BT709, _Transfer=vs.TRANSFER_BT709, _Primaries=vs.PRIMARIES_BT709)
Refer to the libplacebo and vs-placebo docs to gain a better understanding of what each parameter does.
#
Range
Sets the color range of the clip as limited (0) or full (1). This should be used on sources containing incorrect metadata.
## Color range: Marks the clip's range as limited (0) or full (1); DV clips will need to be set to limited (0) after tonemapping
clip1 = core.resize.Lanczos(clip1, format=vs.YUV444P16, range=0)
clip2 = core.resize.Lanczos(clip2, format=vs.YUV444P16, range=0)
clip3 = core.resize.Lanczos(clip3, format=vs.YUV444P16, range=1)
#
Gamma
Adjusts the gamma level of the video. This should only be used to fix the QuickTime gamma bug or similar issues where one source will appear much brighter than the rest.
## Gamma: Fixes gamma bug (i.e. one source is significantly brighter than the others) [32-bit required]
## Convert clips to 32-bit [required for gamma fix]
clip1 = vstools.depth(clip1, 32)
clip2 = vstools.depth(clip2, 32)
clip3 = vstools.depth(clip3, 32)
## Apply fix
clip1 = core.std.Levels(clip1, gamma=0.88, planes=0)
clip2 = core.std.Levels(clip2, gamma=0.88, planes=0)
clip3 = core.std.Levels(clip3, gamma=0.88, planes=0)
#
FrameProps
Set the correct frame properties for your sources. This is most commonly used on sources you're upscaling or 4K SDR content. This should be used on sources with incorrect/missing metadata or colors that are off, particularly in reds and greens.
## FrameProps: Repairs sources with incorrect/missing metadata; typically used for 4K SDR and upscaled/downscaled content (colors will be off, particularly reds, greens, and blues)

# SDR: BD/WEB (720p - 4K)
clip1 = core.std.SetFrameProps(clip1, _Matrix=vs.MATRIX_BT709, _Transfer=vs.TRANSFER_BT709, _Primaries=vs.PRIMARIES_BT709)

# SDR: PAL DVD
clip2 = core.std.SetFrameProps(clip2, _Matrix=vs.MATRIX_BT470_BG, _Transfer=vs.TRANSFER_BT470_BG, _Primaries=vs.PRIMARIES_BT470_BG)

# SDR: NTSC DVD
clip3 = core.std.SetFrameProps(clip3, _Matrix=vs.MATRIX_ST170_M, _Transfer=vs.TRANSFER_BT601, _Primaries=vs.PRIMARIES_ST170_M)

# HDR/DV
clip4 = core.std.SetFrameProps(clip4, _Matrix=vs.MATRIX_BT2020_NCL, _Transfer=vs.TRANSFER_BT2020_10, _Primaries=vs.PRIMARIES_BT2020)
#
Double-Range Compression (DRC)
Fixes washed out/blown out colors on selected sources.
## Fix DRC: Repairs sources with very washed out colors
clip1 = core.resize.Point(clip1, range_in=0, range=1, dither_type="error_diffusion")
clip1 = core.std.SetFrameProp(clip1, prop="_ColorRange", intval=1)
## Fix Reverse DRC: Repairs sources with extremely crushed blacks and blown out highlights
clip1 = core.std.SetFrameProp(clip1, prop="_ColorRange", intval=0)
clip1 = core.resize.Point(clip1, range_in=1, range=0, dither_type="error_diffusion")
#
Running
To run your comparison script, launch a terminal window in your working directory and run the following:
vspreview comp.pyAlternatively, you can create a create a comp.bat file, replacing C:\path\to\comp.py with the exact file path to your script:
vspreview "C:\path\to\comp.py"
#
First-time Setup
Drag the Plugins menu from the right-side of the VSPreview window and open the SlowPics Comps tab. Alternatively, you can access the Plugins menu using
Ctrl+PUnder Settings, set the following:
- Set Collection Name Template to
{tmdb_title} ({tmdb_year}) - S01E01 - {video_nodes} - Set Compression Type to
Slow - Enter your slow.pics username and password (optional)
- Tick the Public Flag
- Set Collection Name Template to
Click the Settings button on the bottom tab. Under Main, change Save Plugins Bar Position to
GlobalClick the Playback button on the bottom tab. Set the bottom-left value to an odd number (e.g
109)
Once complete, close and relaunch VSPreview to apply these changes.
#
Comparing
#
Basic Keybinds
For the purpose of making comparisons, you will only need the following binds:
If you wish to manually set your keybinds, you can find them under Settings -> Shortcuts.
#
Capturing
Open the Plugins window and select the SlowPics Comps tab
Set the TMDB type and ID from The Movie Database (e.g.
94605for Arcane)Before creating a comparison, skim through all your sources and ensure that they are displaying correctly. Most issues can be fixed using
filters in your comparison scriptSelect the frames to be uploaded. There are multiple methods to doing so:
- Manual: Scrub through the video and mark each frame using
Ctrl+Space - Automatic: Specify am amount of random frames in the Plugin menu. You may choose to use this feature alongside capturing frames manually
- Frames should ideally show a variety of scenarios (e.g. light/dark, static/high-motion, flat/grainy, etc.). Particularly, you may want to capture scenes with on-screen text and bright reds (if possible).
- Manual: Scrub through the video and mark each frame using
Hit the Start Upload button. VSPreview will automatically screenshot all selected frames and upload a comparsion to slow.pics
We don't recommend using the dark/light frames feature, as it currently has many issues.
#
Additional Scripts
#
Automation
If VSPreview is too complicated to setup, you can use McBaws' script to automatically generate the comparisons for you. However, this script is more limited compared to VSPreview.